Look, I’ve spent hours in the editing suite so you don’t have to—and here’s something most creators completely ignore:
Lighting matters more than your camera.
You can shoot on a basic phone and still look cinematic… or shoot on an expensive camera and look terrible. The difference?
The secret to perfect lighting for talking head reels at home.
In 2026, with AI-enhanced tools like CapCut, Runway, and Sora, editing is easier than ever—but bad lighting? AI can’t fully fix that.
And here is the real talk about high-retention editing:
If your face isn’t lit properly, people scroll.
This guide will break down exactly how to master lighting at home so your talking head reels feel clean, cinematic, and high-retention, just like the creators leveling up on vfxcut.xyz.
Why Lighting Directly Impacts Watch Time
Lighting isn’t just about visibility—it’s about perception.
Good lighting:
- Builds trust instantly
- Makes your content feel premium
- Keeps viewers watching longer
Bad lighting:
- Creates harsh shadows
- Reduces clarity
- Feels unprofessional
And in short-form content, you have less than 3 seconds to convince someone to stay.

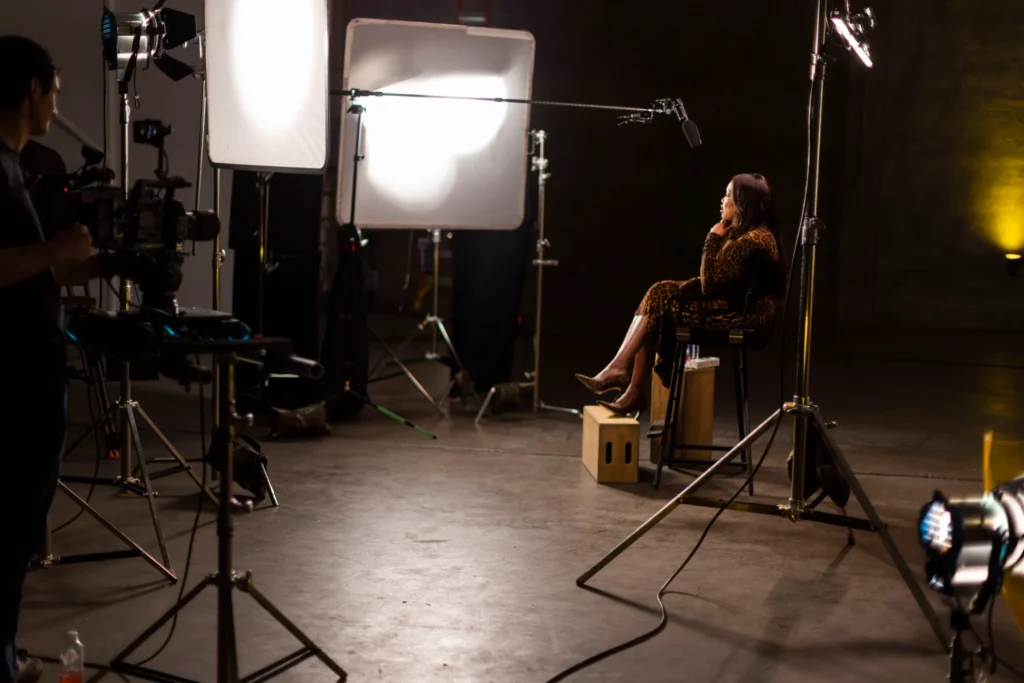
The Core Lighting Setup (3-Point System)
This is the foundation of cinematic talking head videos.
1. Key Light (Main Light)
- Your primary light source
- Positioned at a 45° angle
- Slightly above eye level
This shapes your face and defines your look.
2. Fill Light
- Softens shadows
- Placed opposite the key light
- Lower intensity
If you skip this, your face looks too harsh.
3. Back Light (Rim Light)
- Placed behind you
- Creates separation from background
- Adds depth
This is what gives that “pro YouTuber” vibe.
Best Budget Lighting Options (2026)
You don’t need expensive gear.
Natural Window Light
- Free and powerful
- Best during morning or golden hour
- Use curtains to diffuse
Ring Lights
- Easy to use
- Even face lighting
- Popular for beginners
LED Panels
- Adjustable brightness
- Adjustable color temperature
- More control than ring lights
Practical Lights
Use lamps in the background:
- Adds depth
- Enhances mood
- Improves composition
Comparison Table: Lighting Options
| Lighting Type | Cost | Control | Best For |
|---|---|---|---|
| Window Light | Free | Low | Beginners |
| Ring Light | Low | Medium | Face lighting |
| LED Panels | Medium | High | Cinematic setup |
| RGB Lights | Medium | High | Creative backgrounds |
Step-by-Step: The Secret to Perfect Lighting for Talking Head Reels at Home
Let’s build your setup from scratch.
Step 1: Choose Your Light Source
Start simple:
- Use a window or LED panel
- Avoid overhead lighting (it creates shadows)
Your light should always come from the front/side.
Step 2: Position Your Key Light
This is critical.
- Place at 45° angle
- Slightly above eye level
- Aim toward your face
This creates natural facial shadows.
Step 3: Control Shadows with Fill Light
No second light?
Use this trick:
- Reflect light using a white wall
- Use a white paper or foam board
Cheap but effective.
Step 4: Add Background Separation
Use a backlight or lamp:
- Place behind you
- Aim at shoulders or hair
This creates depth and prevents flat visuals.
Step 5: Adjust Color Temperature
Consistency is key.
- Warm light = cozy feel
- Cool light = professional tone
Mixing colors incorrectly kills your look.
Step 6: Fine-Tune Exposure
Inside CapCut:
- Adjust brightness
- Fix highlights
- Balance shadows
Lighting + color grading = cinematic result.
Lighting Settings Checklist
Before recording:
- Face evenly lit: ✔
- No harsh shadows: ✔
- Background separated: ✔
- Light direction consistent: ✔
- Color temperature matched: ✔
- No overexposed highlights: ✔
- Eyes clearly visible: ✔
High-Retention Lighting Techniques (2026)
1. Eye Catchlights
Your eyes should reflect light.
This creates:
- Connection
- Energy
- Trust
2. Contrast Control
Don’t eliminate all shadows.
Some shadow = depth
Too much shadow = distraction
3. Background Lighting
Add subtle lights behind you:
- RGB glow
- Warm lamp
- Accent lighting
This makes your frame feel alive.
4. Lighting for Movement
If you move while talking:
- Keep lighting wide
- Avoid harsh directional beams
Integrating Lighting with Editing
Lighting doesn’t end at recording.
In Runway:
- Enhance exposure
- Fix inconsistencies
- Smooth lighting transitions
In Sora:
- Generate cinematic lighting styles
- Enhance visual mood
You can even use keyframing to adjust lighting dynamically across scenes.
Common Lighting Mistakes (Avoid These)
Let me save your time:
- Using only overhead lights
- Mixing warm and cool lighting
- Sitting too far from light source
- Overexposing your face
Also—don’t rely on editing to fix bad lighting. It rarely works.
Advanced Setup: Cinematic Home Studio
Here’s what pro creators are doing:
- Key light (soft LED panel)
- Fill light (bounce or soft light)
- Back light (RGB accent)
- Background practical lights
Then:
- Shoot clean footage
- Enhance with color grading
- Add subtle keyframing adjustments
This hybrid setup creates high-retention visuals.
Final Thoughts (Creative Mentor Mode)
Look—mastering the secret to perfect lighting for talking head reels at home is one of the fastest ways to upgrade your content.
You don’t need expensive gear.
You need:
- Good light placement
- Consistent color
- Intentional setup
If your lighting looks clean, your content feels professional—even if your shooting on a phone.
And in 2026, that’s what wins.
Call to Action
Now it’s your turn.
Set up your lighting using this guide and record a short talking head reel. Focus on positioning, shadows, and consistency.
Once you see the difference, you’ll never go back.
And if you want more pro-level tutorials, editing workflows, and insider strategies, check out vfxcut.xyz—the ultimate hub for short-form creators and VFX enthusiasts.
Your next viral reel doesn’t start with your camera.
It starts with your lighting.