Look, I’ve spent years fixing grainy, noisy low-light footage in post-production so you don’t have to—and here’s the truth most creators learn the hard way:
Bad low-light settings can destroy even the best creative idea.
You can have perfect storytelling, strong hooks, and viral pacing—but if your night footage looks muddy, viewers scroll instantly.
Here is the real talk about high-retention editing:
Low-light content is where creators either look amateur or cinematic. There is no middle ground.
In 2026, platforms like TikTok and Instagram Reels are pushing cinematic realism more than ever, and creators are now using AI-enhanced workflows with tools like CapCut, Runway, and Sora to clean up mobile footage and elevate night visuals.
And yeah—this is exactly the kind of workflow used by creators on vfxcut.xyz to turn low-light phone clips into cinematic short-form content.
Why Low-Light Settings Matter More Than Ever
Low-light content is everywhere now:
- Night vlogs
- Street reels
- Neon aesthetic edits
- Car POV videos
- Indoor cinematic shots
But the challenge is always the same:
- Noise (grain)
- Motion blur
- Loss of detail
- Poor color accuracy
Your camera settings determine whether your footage is usable—or ruined.
The Science Behind Low-Light Mobile Video
Low-light performance depends on:
- Sensor sensitivity (ISO)
- Light intake (aperture)
- Shutter speed
- Digital processing
Your goal is simple:
👉 Let in more light without destroying clarity.
Best Mobile Camera Settings for Low-Light Short-Form Content
Let’s break it down like a pro cinematographer would.
1. Frame Rate: 30fps (or 24fps for cinematic look)
- 30fps = balanced motion + light capture
- 24fps = more cinematic but less smooth
Avoid 60fps in low light unless necessary—it reduces light intake.
2. Shutter Speed: 1/50 or 1/60 Rule
This is critical.
- 30fps → 1/60 shutter
- 24fps → 1/50 shutter
Why?
- Prevents unnatural motion blur
- Maintains cinematic realism
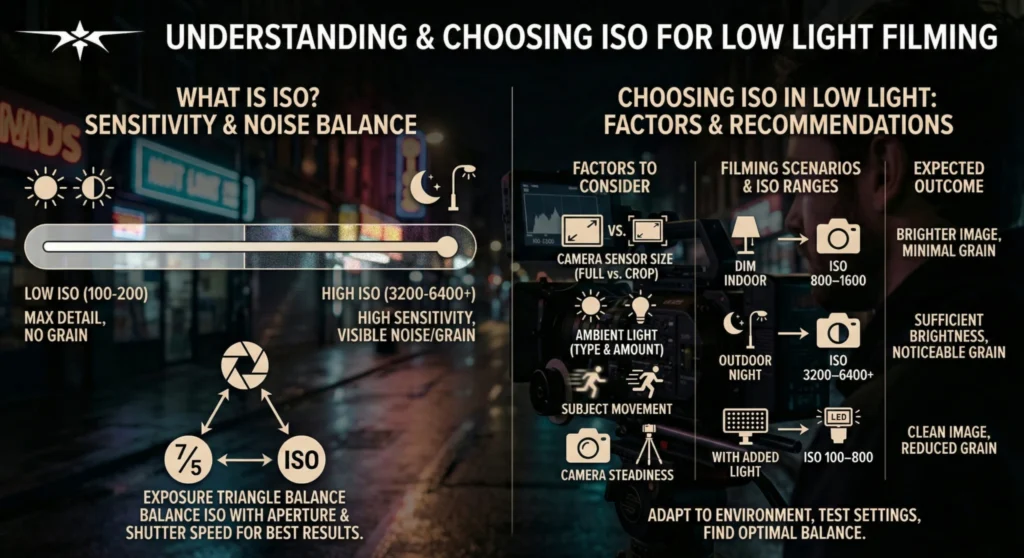
3. ISO: Keep as Low as Possible
- Ideal range: ISO 100–800
- Avoid going beyond 1600
Higher ISO = more noise.
4. White Balance: Lock It Manually
Do NOT use auto white balance.
Set manually:
- Warm lighting → 3000K–4000K
- Street lights → 4000K–5000K
- Neon → adjust based on tone
This prevents color shifting mid-shot.
5. Exposure Compensation (-0.3 to -1.0)
Slightly underexpose your shot:
- Preserves highlights
- Reduces noise amplification
- Improves grading flexibility
6. Focus Mode: Manual or Locked AF
Avoid autofocus hunting.
Use:
- Manual focus
- Tap-to-lock focus
Keeps subject stable.
7. HDR Mode: OFF for Video
HDR in low light often:
- Creates ghosting
- Adds unnatural contrast
- Reduces cinematic feel
Mobile Camera Settings Checklist (Low-Light Optimization)
Before recording:
- Frame rate locked (24/30fps): ✔
- Shutter speed matched: ✔
- ISO kept low: ✔
- White balance locked: ✔
- Exposure slightly reduced: ✔
- Focus locked: ✔
- HDR disabled: ✔
Comparison Table: Low-Light Editing Tools (2026)
| Tool | Noise Reduction | AI Enhancement | Best Use Case |
|---|---|---|---|
| CapCut | ⭐⭐⭐⭐ | ⭐⭐⭐⭐ | Fast mobile edits |
| Runway | ⭐⭐⭐⭐⭐ | ⭐⭐⭐⭐⭐ | AI cleanup + enhancement |
| Sora | ⭐⭐⭐⭐ | ⭐⭐⭐⭐⭐ | Cinematic generation |
| Native Camera | ⭐⭐⭐ | ⭐⭐ | Raw capture only |
Step-by-Step: How to Shoot and Edit Low-Light Mobile Content
Let’s build a pro-level workflow.
Step 1: Control Your Light Source
In low-light shooting:
- Use practical light (lamps, neon, street lights)
- Avoid complete darkness
- Add small fill light if possible
Even weak light is better than none.
Step 2: Lock Your Camera Settings
Set manually:
- Frame rate
- ISO
- Shutter speed
- White balance
This prevents auto adjustments ruining your shot.
Step 3: Stabilize Your Shot
Low light = more motion blur risk.
Use:
- Tripod
- Gimbal
- Or stable handheld grip
Shaky footage becomes worse in darkness.
Step 4: Shoot in Short Takes
Avoid long continuous shots.
Instead:
- Record multiple short clips
- Focus on key moments
This improves editing flexibility.
Step 5: Import Into CapCut
Inside CapCut:
- Apply noise reduction
- Stabilize footage
- Adjust brightness carefully
Step 6: AI Enhancement for Low-Light
Use Runway to:
- Reduce grain
- Enhance shadows
- Improve sharpness
AI helps recover lost detail.
Step 7: Color Grading for Cinematic Look
This is where transformation happens.
Use color grading to:
- Add contrast
- Boost shadows
- Slightly desaturate highlights
- Apply cinematic LUTs
Goal: film-like mood, not phone look.
Step 8: Enhance with AI Generation (Optional)
Use Sora for:
- Cinematic inserts
- Lighting enhancements
- Scene extensions
High-Retention Low-Light Editing Techniques
1. Contrast-Based Editing
Low-light content works best when:
- Bright highlights pop
- Shadows stay deep
2. Motion Illumination Technique
Move light sources during recording:
- Walking past neon lights
- Passing cars
- Flickering signs
Adds cinematic energy.
3. Micro Light Flares
Use editing effects to simulate:
- Lens flares
- Glow effects
- Light leaks
4. Slow Reveal Cuts
Don’t show everything instantly.
Reveal:
- Subject gradually
- Environment slowly
Builds curiosity.
Common Mistakes (Avoid These)
Let me save your footage:
- Using auto ISO in dark scenes
- Overexposing night shots
- Ignoring white balance
- Recording in total darkness
- Over-sharpening noisy footage
Also—don’t try to “fix” bad lighting in post only. It starts at capture.
Advanced Workflow: Cinematic Low-Light Mobile System
Here’s what pro creators do:
- Set manual camera controls
- Use controlled lighting environment
- Shoot short stabilized clips
- Import into CapCut
- Apply noise reduction
- Enhance with Runway AI
- Apply cinematic color grading
- Final polish with sound design
This system turns low-light footage into cinematic content.
Final Thoughts (Creative Mentor Mode)
Look—mastering best mobile camera settings for low-light short-form content isn’t about having the best phone.
It’s about understanding light, control, and discipline.
Every setting you adjust:
- Protects your image quality
- Enhances cinematic feel
- Improves retention
If your low-light footage looks clean and intentional, your entire content level rises instantly—even if you’re filming on a budget phone.
And that’s the real advantage in 2026.
Even simple night clips can look like movie scenes if you know what you’re doing.
Call to Action
Now it’s your turn.
Go shoot a low-light video using these exact settings and apply the editing workflow above. Focus on light control, stability, and color grading.
When done right, your footage will instantly look more cinematic and professional.
And if you want more advanced mobile filmmaking guides, AI editing workflows, and VFX breakdowns, check out vfxcut.xyz—the ultimate hub for short-form creators and VFX enthusiasts.
Your next viral night reel doesn’t depend on your camera.
It depends on how you control the light.