Learn the best CapCut export settings for 4K 60fps TikToks with pro VFX workflow, retention tips, and AI editing insights.
If you’ve ever uploaded a perfectly edited video to TikTok only to see it come out blurry, compressed, or just… disappointing, you’re not alone.
Look, I’ve spent hours in the editing suite so you don’t have to, and I can tell you one thing with absolute certainty: export settings decide whether your video looks viral or amateur.
In 2026, TikTok’s compression algorithm is smarter than ever. That means your export settings in CapCut are now just as important as your editing itself.
This guide breaks down the Best CapCut export settings for 4K 60fps TikToks, plus pro-level tweaks used by high-end short-form creators and VFX artists.

Why Export Settings Matter More in 2026
TikTok, Instagram Reels, and YouTube Shorts now use adaptive AI compression.
That means:
- Low-quality exports get heavily compressed again
- High-quality exports retain more detail
- Wrong bitrate = blurry edges + broken motion
Even if your editing is perfect with keyframing, color grading, and transitions, bad export settings can kill retention instantly.
Here is the real talk about high-retention editing: export is the final boss fight.
Ideal Software Workflow for 4K 60fps Editing
Before export, your pipeline matters.
Most professionals use:
- CapCut – Fast AI editing + mobile workflow
- Adobe Premiere Pro – Advanced color grading & precision edits
- Runway ML – AI background enhancement
- Sora – AI-generated cinematic clips
But 80% of viral TikToks are still fully edited in CapCut because of speed and AI features.
CapCut vs Premiere Pro Export Performance (4K 60fps TikTok)
| Feature | CapCut | Premiere Pro |
|---|---|---|
| Export Speed | Very Fast | Moderate |
| 4K 60fps Stability | High | Very High |
| TikTok Optimization | Auto preset support | Manual setup |
| AI Compression Handling | Built-in smart export | External plugins needed |
| Beginner Friendly | Excellent | Complex |
For TikTok creators, CapCut is the fastest path to high-quality output.
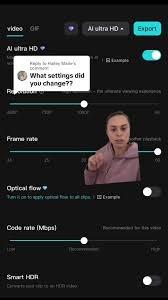
Best CapCut Export Settings for 4K 60fps TikToks
Let’s go step by step.
Step 1: Resolution Settings
Set resolution to:
- 4K UHD (3840×2160) if your footage supports it
- Otherwise, 1080×1920 vertical (optimized for TikTok)
Important: TikTok still compresses everything, but 4K gives it more data to work with.
Step 2: Frame Rate (CRITICAL)
Set frame rate to:
- 60fps (recommended for motion-heavy edits)
- 30fps (only for cinematic or slow content)
60fps is the standard for viral edits in 2026 because:
- Smoother motion
- Better slow-motion replays
- Higher perceived quality
Step 3: Bitrate Settings (MOST IMPORTANT)
This is where most creators mess up.
Recommended settings:
- 4K 60fps → 40–60 Mbps
- 1080p 60fps → 20–35 Mbps
If bitrate is too low:
- Video looks compressed
- Edges become blurry
- Motion artifacts appear
If bitrate is too high:
- File becomes too large
- TikTok re-compresses aggressively
Balance is everything.
Step 4: Codec Selection
Use:
- H.264 (best compatibility)
- H.265 (HEVC) for smaller file size with better quality
In most cases, H.265 gives better compression efficiency in CapCut exports.
Step 5: Color Space Settings
Set to:
- SDR (Standard Dynamic Range) for TikTok stability
- Avoid HDR unless specifically needed
HDR often causes unpredictable brightness shifts after upload.
Step 6: Audio Settings
- Sample Rate: 48kHz
- Bitrate: 320kbps
- Stereo output recommended
Audio clarity is underrated but massively affects retention.
Pro Export Checklist (2026 Standard)
Before exporting, check:
- ✔ 4K resolution enabled
- ✔ 60fps selected
- ✔ Bitrate between 40–60 Mbps
- ✔ H.264 or H.265 codec
- ✔ No HDR unless required
- ✔ Audio synced properly
- ✔ No unnecessary filters added post-export
AI Export Optimization (New 2026 Trick)
Modern CapCut AI systems now include smart export features.
When enabled:
- AI detects motion complexity
- Automatically adjusts bitrate zones
- Reduces compression artifacts
- Enhances facial clarity in fast motion
Combine this with tools like Runway ML for even cleaner motion scenes.
Common Export Mistakes (That Kill Viral Reach)
Mistake 1: Exporting at Too Low Bitrate
This is the #1 reason videos look “cheap”.
Mistake 2: Using Wrong Frame Rate
Mixing 30fps clips in 60fps export causes jitter.
Mistake 3: Over-Compressing Before Upload
Double compression destroys quality.
Mistake 4: Ignoring Color Grading Before Export
Poor grading = flat visuals = low retention.
Even small mistakes can reduce watch time drastically.
Advanced VFX Editor Tips (From Real Experience)
1. Always Match Timeline FPS to Export FPS
If your timeline is 60fps, your export must also be 60fps.
2. Use Motion Blur Subtly
Adds cinematic realism without hurting clarity.
3. Keep Sharp Edges Clean
Avoid over-sharpening—it creates compression artifacts.
4. Test Uploads Before Final Posting
Always upload a private test version to check compression.
Why 4K 60fps Is Dominating TikTok in 2026
The algorithm now favors:
- Smooth motion content
- High clarity visuals
- AI-enhanced video stability
4K 60fps gives:
- Better zoom quality
- Cleaner motion transitions
- Stronger viewer retention
And retention is everything.
Where vfxcut.xyz Comes In
At vfxcut.xyz, we break down real-world editing systems used by viral creators—not theory, but actual workflows.
From:
- Keyframing secrets
- Color grading breakdowns
- AI-powered editing pipelines
- Viral retention structures
This is your hub if you want to go beyond basic edits.
Final Thoughts
The Best CapCut export settings for 4K 60fps TikToks are not just technical values—they are a creative strategy.
You can have perfect edits, smooth transitions, and cinematic keyframes, but if your export is wrong, the algorithm will punish your content.
Remember this:
Editing gets attention. Export keeps it.
CTA
Now it’s your turn.
Try these export settings in your next reel, experiment with bitrate and FPS combinations, and observe how your retention changes.
Then explore more advanced breakdowns and viral editing techniques on vfxcut.xyz, your ultimate hub for short-form creators and VFX enthusiasts.
Go create something that actually looks as good as it should.